Hey Aileen, I love your blog! I have been your follower for quite a while and you inspire me a lot! Right now, you inspired me to do one thing that I have been postponing for years and that’s how to start a travel blog or even just how to start a blog of any kind and lead a remote lifestyle like yours.
.
I don’t want to spend too much so I want to build everything myself… but I don’t have any know-how or web design skills. Is this still possible?
– Lidia from Califorinia, USA
Yes, absolutely!
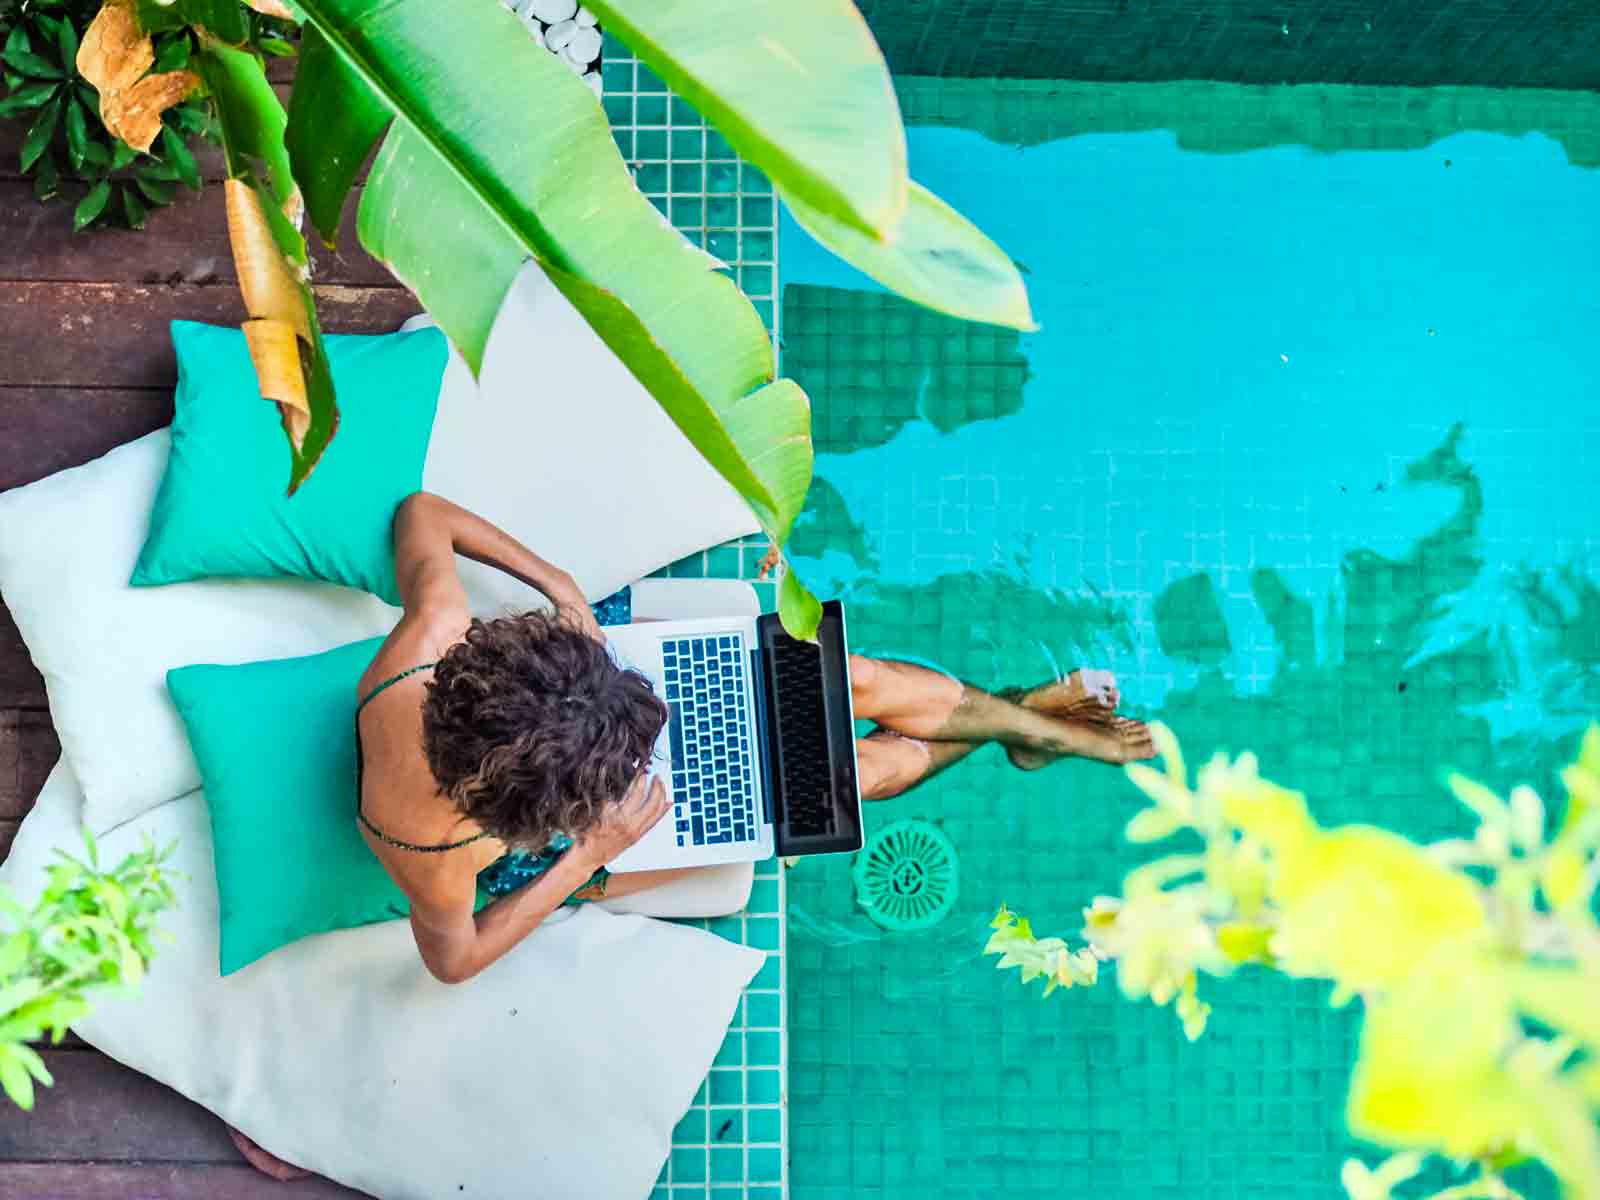
I get a lot of messages like this, and I get it. I really do. Being a travel blogger is an amazing profession that can enable anyone to travel the world AND even get paid for it.
I’ve been doing this full-time for more than 5 years now, and sometimes, I still need to pinch myself to know that all of it is real! I’ve truly gained a lot from this travel blog: financial independence, non-stop travels to all 7 continents, notable press features, international awards, and so much more. In fact, it’s because of these achievements that it has since been my mission to help YOU experience all of these too.
To date, there are a HUGE number of articles out there about how to start a travel blog and I’m sure it’s quite overwhelming for you. However, let me save you time, effort, and money with this detailed step-by-step guide that is easy to follow and easy to understand! (There’s no need to get all anxious about any technical terms and processes because I’ve got your back!).
Plus, armed with my years of blogging experience and authority, as well as my past know-how of web design and development, you can definitely trust me in helping you launch the blog of your dreams from scratch!
NOTE: Truth be told, this guide does not only apply to aspiring travel bloggers because the steps below can also apply to other kinds of lifestyle blogs that you might want to start: for art, beauty, fashion, lifestyle, photography, sports, tech, etc.
Already Got a Blog?
Check out my top blogging tips to help make your blog a constant success!
SIDE NOTE: It can be a challenge to do travel blogging if you are having a hard time figuring out how you can jumpstart a travel lifestyle. In case you have this dilemma, don’t fret! The following articles will help you travel the world:
» How to Travel the World: 5 Steps to Start
» Best Travel Jobs to Make Money While Traveling
» How to Save Money for Travel
DISCLAIMER: Some of the links mentioned on this page (such as BlueHost) are affiliate links. This means that if you click and make a purchase, I will receive a small commission in return which is at NO extra cost to you and which will also help me run this blog.
.As always, however, I only recommend products and services that I trust and have personally used — and honestly, I’d still recommend them even if I’m not an affiliate!
Now, without further ado, let’s start!
Step 1: Find Your Target Audience and Specific Niche

I can guess what you’re thinking…
“But isn’t travel already a niche?“
Not really. It’s an industry, yes, but it is NOT a niche. In order to attract a good audience and build a relevant community from the very start, you would need to establish yourself in a more definite field of travel — a niche.
Surely you can talk about travel as a whole, but as a ‘newbie’, it doesn’t help to market yourself as someone who is knowledgeable about all aspects of travel. This won’t definitely attract anyone to your website, because they can just go to bigger trusted authority websites like Lonely Planet or Nomadic Matt for travel tips.
So what do you first need to do…? Place yourself in a specific niche that will help foster your growth and build your influence from the ground up. To do this, I highly recommend adopting this new concept called Blue Ocean Strategy wherein you position yourself in a ‘blue ocean’ rather than a ‘red ocean’.
RED OCEAN
- In an existing saturated niche with lots of competition
- Exists in a broad spectrum
- Slow growth and tries to capture existing demand
↓
“A blog about traveling in a van”
BLUE OCEAN
- In a new market with little to no competition
- Exists in a specific spectrum
- Stands out and captures new demand
↓
“A blog about traveling in a van on a budget for families in the USA”
As you can see, if you’re in a ‘blue ocean’, there is a deeper potential for you to achieve rapid growth because you are targeting a distinct market space that is untainted by competition yet still filled with a lot of opportunities. So in order to arrive at your very own blue ocean, you can take out a pen and paper and start writing down some topics or styles of travel that you’re interested in — or are good at.
When you’re done laying out all those ideas before you, you can now follow these 3 steps to narrow down your blue ocean:
- First, find a broad or common theme that you want to tackle or find a solution to in your travel blog
- (a target market: e.g. people looking to travel in a van)
- Find a subset of that theme or target market that you want to specialize in
- (a niche: e.g. families in the USA looking to travel in a van on a budget)
- This last step isn’t usually done by most but it helps to imagine the kind of ideal individual that you want to “serve” so that you have a clearer idea of the audience you want to target. To find this special profile, simply imagine an individual with clear characteristics that you want to cater to as dependent on the niche you picked from step #2
- (the ideal client/reader/audience: a parent in the USA looking to bring the whole family to travel or live in a van indefinitely yet sustainably on a budget in order to avoid high house rental or mortgage costs, and maybe even find a way to make a living while doing it such as through remote travel work)
.
- (the ideal client/reader/audience: a parent in the USA looking to bring the whole family to travel or live in a van indefinitely yet sustainably on a budget in order to avoid high house rental or mortgage costs, and maybe even find a way to make a living while doing it such as through remote travel work)
And that’s it! You’ve now pinpointed your blue ocean. Now, heed my next advice: stick to it.
Why do I say this? Well, let’s say you started off with posts about budget travel for van life. After a few months, you have managed to build a community that is interested in your content — good job! But then suddenly, you release articles about luxury travel and an assortment of other topics. With this scenario, there’s a high chance that you will lose a certain chunk of your audience, and if you continue to be finicky about your topics and your expertise, you will continue to lose a number of people. Fast.
So hear me out on this. Save the grand mix of travel tips/articles/guides/etc. once you get bigger with a more ‘entrenched’ audience that is interested in you as a travel blogger or personality.
As an added example, let’s talk about my blog. At the very start, I positioned myself in a niche for solo travel that targets 20 to 30-something individuals (especially from third world countries) that want to learn how to travel the world. When my blog became an established authority on the web, I started to deviate from this as I shared a wider variety of travel topics — while still making my niche the core or center of it all.
Other examples of niche travel blogs:
- The Blonde Abroad – focuses on solo female travel after quitting your 9-to-5
- Travel with Bender – focuses on around-the-world family trips with kids
- Wandering Earl – focuses on budget travel and a permanent nomadic lifestyle
- The Points Guy – focuses on hacks for travel points and miles
- Will Travel for Vegan Food – focuses on traveling the U.S.A. as a vegan
.
BOTTOM LINE: When you want to know how to start a travel blog the right way, you should first be a personality or an expert in a specific sub-topic of travel with a targeted audience (i.e. your own blue ocean). If, however, you are not confident enough about your travel knowledge since you’re still new or still in the process of planning your journey, what you can do, at the very least, is to ensure that you have a unique story that will make anyone interested in following you. In a way, just put yourself in your readers’ shoes and find out what will make them tick.
• • •
Step 2: Brainstorm a Kickass Blog (Domain) Name
 name!")
“…domain whaaaaat?“
To put it into simple words, a domain name is the unique ‘address’ of your blog on the internet. For instance, this blog’s domain name is iAmAileen.com and it will remain to be my unique identifier for as long as I continue to pay an annual fee.
Yes, a FEE. To be able to get these .com names, you would have to pay — rest assured, if you follow step 3 of this how to start a travel blog guide, you’ll get your domain name for FREE!
So now that you are aware of the fact that a serious plan of starting a travel blog involves money (as well as hard work and dedication -wink-), if it’s just going to be a hobby or if you’re not that motivated enough to do it earnestly, you can always go for free platforms like Tumblr, WordPress.com (different from WordPress.org), and Blogspot.
Just be reminded, however, that in these kinds of free-‘hosted’ blogs there are several disadvantages:
- They are NOT good for search engine rankings – meaning that your blog won’t be as visible on Google, Bing, Yahoo, etc. as compared to the ones who have domain names.
- You are not allowed to sell ads on your sites (this equals to NO earning opportunities for you); alternatively, these hosts can put ads on your website which is of no benefit to you.
- They have limited plugins and themes, or things that you need to optimize and ‘prettify’ your blog.
- They are not flexible. You will NEVER be in full control; also, the platform can delete your site at any time if they think it violates any of their site terms.
- They are not essentially ‘professional-looking’, so advertisers and brands won’t be so keen on partnering with you
- They take some time to type! Think: yourblogname.blogspot.com versus yourblogname.com – the second one is better, right?
.
This is why it helps to have your own domain name and hosting because it can offer you a lot of benefits and possibilities (for such an affordable price!) and it saves you the hassle of doing transfers in the future (from free-hosted to self-hosted). So if you’re a part of the determined ones, let’s get you started on your awesome travel blog’s domain title or name!
How to properly choose a travel blog name?
Come read my comprehensive guide on how YOU could come up with the best ideas on travel blog names! (Complete with step-by-step instructions, tips, ideas and examples).
When brainstorming for ideas on travel blog names, here are the top things that you should take note of:
- Make sure that it’s easy to remember — try to keep it short, too! Most of us have short attention spans anyway, so it’s a must to swiftly stand out from the crowd in order to be firmly remembered. Also, people want it fast and easy, that’s why it helps if your name would NOT take more than 2 seconds to type. Other things to take note of:
- Avoid hyphens or numbers because you risk people typing it out wrongly when they spread your blog’s name by word of mouth
- Avoid words that are not easily recognized or spelled by other people (especially words that are not in English, unless of course, you want to focus only on audiences in your home country)
- TIP: Try sharing your name with your mom or grandparents; if they’re having a hard time spelling it out, you’ll know you’re picking the wrong name
- Check if it’s good when combined together. For example, if you pick a name like “Speed of Art” if it’s squished up as a website URL it will look like: www.speedofart.com — you wouldn’t want that, would you?
- This will be the name that you will be introducing to others in the future so make sure it’s something that you like, love, and are proud of
.
TIP: Check out these 50 unique and unusual travel words to get some inspiration!
- Try to make it related to travel. Do NOT follow my example unless you’re really stubborn. (IRRELEVANT TRIVIA: I decided to stick with my blog title, ‘I am Aileen’ since I still have that *funny* lifelong goal of making ‘Aileen’ a well-known name worldwide that is not, in any way, related to the famous murderer, Aileen Wuornos.) As such, take note of these tips…
- Try to be unique and original. Go and play around with a combination of words. Use a thesaurus if you need to! Mix it with your name or nickname. Invent a word if you have to (but make sure it’s an easy word). Examples of unique names: Just One Way Ticket and The Planet D
- Avoid words like adventurous, backpacker, global, journey, nomad, or wander because they are used a LOT. They are even already taken by big travel bloggers like Adventurous Kate, Nomadic Matt, Wandering Earl, etc. so you have to steer clear of this. Why? Because you want people to recall YOU when they think of a word or phrase — surely if you go for ‘Adventurous YourName’, you’ll make other people think of the more popular one (e.g. Adventurous Kate) instead of you, and that would clearly do you no good.
- You can definitely go for SEO-friendly titles like ‘Solo Backpacker’, but then it’s so generic that people can easily forget your blog.
.
All in all, it’s important to have a travel-related name because apart from the fact that you have to market yourself as a travel blog, you also have to mind your blog’s standing on search engines and having a name that’s related to travel with your top keywords included will already help your whole site’s SEO.
What is SEO? It’s short for ‘Search Engine Optimization’ and it’s an important aspect that every website owner should know of when learning how to start a travel blog. After all, knowledge of SEO will help increase the number of visitors on your site, as well as its visibility on search engines like Google, Bing, Yahoo, etc.
.If you want to learn more about this, you can go to Moz or SearchEngineLand given that they offer great FREE courses for SEO beginners like you! For more comprehensive courses, check Udemy.
.
- Make it timeless; think long term! Your name will be your brand forever, so don’t tie yourself with a current trend or situation that’s bound to fade away.
- If you don’t intend to travel as a backpacker forever, don’t choose a name that will suggest that, or you’ll find it a bit hard to score with bigger luxurious hotels in the future.
- Don’t come up with something like ‘365 Days of Travel’ if you plan to keep your travel blog for more than a year.
- Don’t use ‘Teenage Traveler’ since, well, you are going to get old… but then again, it can be quite charming, so it’s up to you. Unless of course, you want a niche that discusses teen travel tips only for eternity to come.
- Consider that if you put ‘The Philippine Nomad’ they might think that you’re just concentrated on the Philippines — unless that’s what your travel blog is about.
.
- Check its availability. Once you have a name in mind after following the aforementioned steps that I’ve stated in this guide of how to start a travel blog, it’s time to check if it’s available as a .com address. To do this, simply go to Bluehost to check.
NOTE: If you still don’t have a name in mind — it’s okay! Just continue with step 3 below and decide on your blog name later!
.
Anyhow, if your domain name idea is still available as a domain, next, you should check if it’s available across all social media channels to also ensure that the username is not taken yet. To do this with ease, use the website KnowEm.
Try Googling your name too! Use quotation marks (“your blog name“) to see if someone has already used your name phrase on another site, or if it’s related to some shady site or branding. If you’re in the USA and planning to register your blog as a business in the future, it’s a good idea to check if your name is trademarked. You can check this by going here.
• • •
Step 3: Set Up Your Travel Blog’s Domain and Hosting

“Wait, what’s a hosting?“
A host or hosting is basically a service that you need to avail together with your domain in order to reserve your spot on the internet — it’s a place that hold’s all your blog’s data, posts, photos, and more. This means that once it’s connected with your domain name and someone types it out on their browsers, your hosting will work to quickly display your blog to whoever ‘called‘ for it.
So where can you get your hosting? There are a LOT of providers out there.
For example, I bet you have heard of HostGator given that it is one of the most popular hosting sites in the market. BUT heed my advice: Don’t. Get. Them. I’ve been their customer for years before and I encountered far too many problems with their hosting plans: they suspend my website for no reason and with no prior notice, the customer service takes too long to reply, live chat was almost like a ‘no chat available’ service, website loading times are slow no matter the optimizations I make, etc. It was the last straw when they suspended my account for the 3rd time!
I then moved to SiteGround — and nope, this is NOT yet the hosting provider that I recommend because I’ve had bad experiences with them too. I made the error of following the advice of other bloggers to go for them; but it turns out that though SiteGround has great customer service, my site still kept crashing! For months’ end, I kept getting penalized for the high CPU usage of my site despite all the optimizations in place. In a nutshell, they just held a low capacity for the traffic I was having on a plan that was supposed to handle what it should.
From then on, I made it a point to find a better host… and I gladly did!
I guess it’s true that the third time is the charm because I am very contented with Bluehost! I absolutely recommend them to anyone. Why so?
- They offer quality hosting for a VERY affordable price. Bluehost rarely has downtimes. They have superb security protocols in place and lightning-fast loading times for websites. Not to mention that most established travel bloggers use them so they’re quite a trusted hosting network! What’s more, they are cheaper than most other popular hosting sites out there.
Enjoy a 50% discount for a basic plan in Bluehost at a cost that starts at $3.95 (Php 175+) only per month! Are you excited yet? Because I am for you!
- They are user-friendly AND beginner-friendly. Their interface is perfect and clear. Additionally, they have a large and easy-to-understand knowledge base full of resources that can answer any question that you may have especially when you’re first learning how to start a travel blog. Otherwise…
- They have amazing customer service. You can just ask them anything and they will do their very best to assist you – ASAP. In fact, they are the most responsive team that I have ever encountered. They have a ’24/7 Live Chat’ feature too and I NEVER had to wait for too long.
.
To get started with Bluehost, simply follow the steps in the following expandable section. (To open/view, click the ‘+’ symbol below).
» How to buy a domain name & hosting plan with Bluehost!
#1. Go to Bluehost’s website and click the tab at the top that says Hosting, and then click Shared Hosting next. You will be seeing this section.
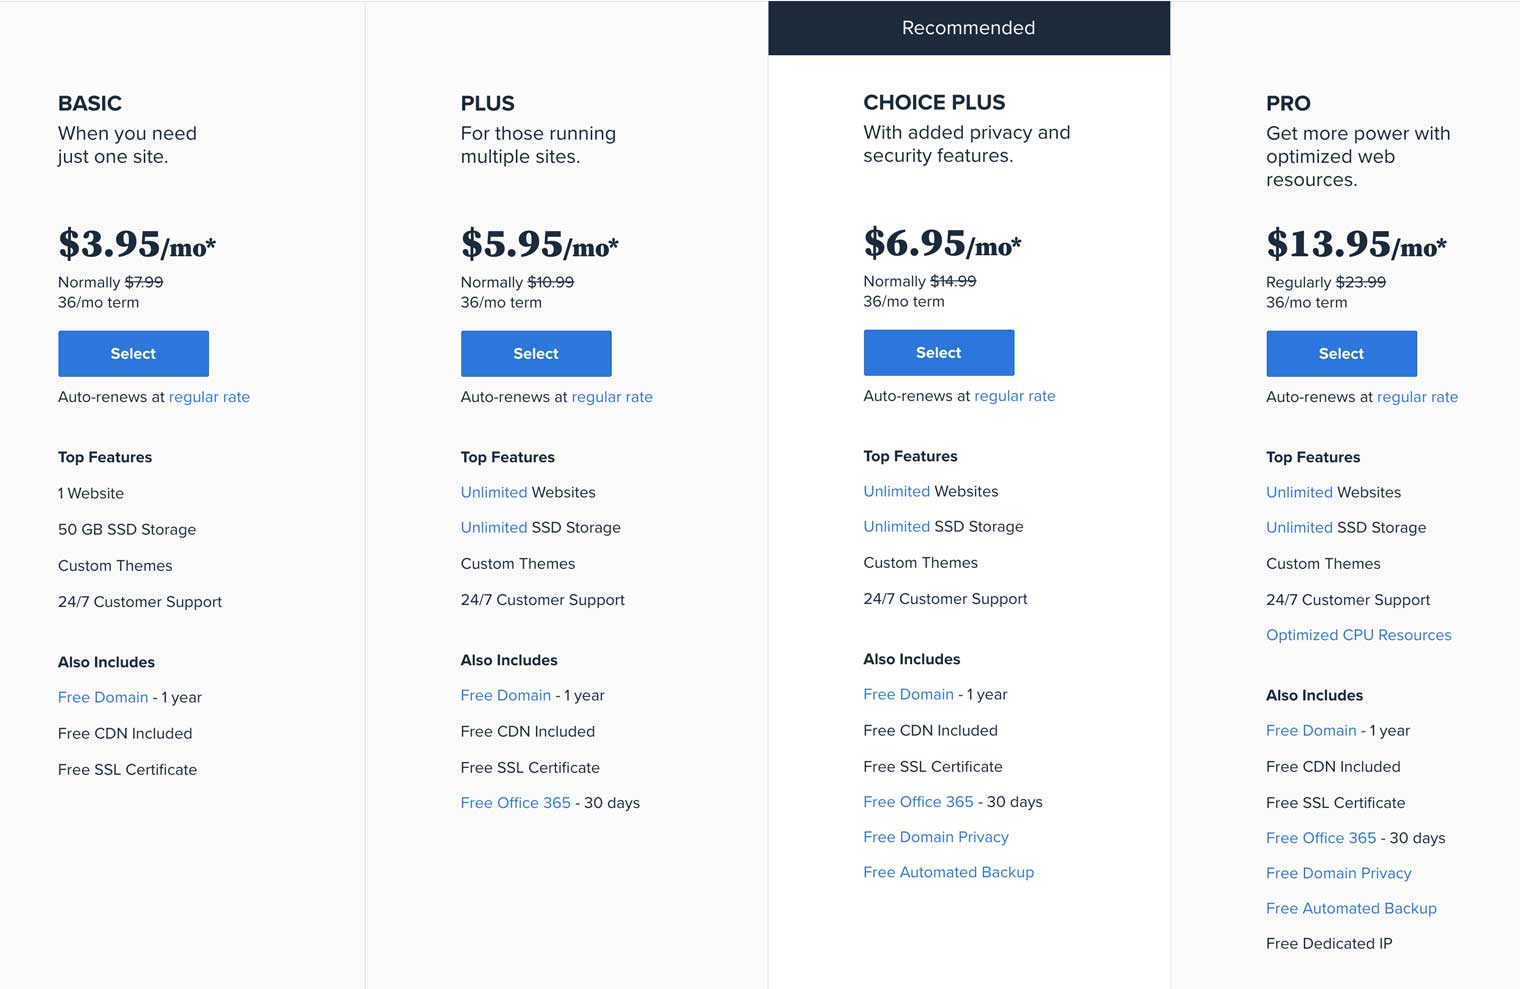
#2. Pick the best plan as you learn how to start a travel blog! Bluehost offers Shared Web Hosting as one of their basic features and they have four (4) plans for this. Depending on your needs, you can pick:
- Basic – a good choice for you if you want a basic plan for one website only
- Plus – a great plan if you want to run multiple websites; this already includes great starter features like FREE SSL certificate, unlimited storage, and others which will greatly improve your site’s security and performance
- Choice Plus – a more comprehensive plan than the former but at a better price point given that it has the prime perk of having domain privacy (protecting your contact info online), security features, and site backups
- Pro – perfect for you if you plan to go big as a blogger while also handling multiple other sites; the biggest difference from Choice Plus on this plan is that you’ll have unlimited site backups and a dedicated IP for the best performance and site speed
If you ask me, the Basic plan is great for starters so this can work just fine (after all you can always upgrade later).
If you have a bigger budget, I suggest getting the Choice Plus plan like I did because not only does it have the best value for a 36-month term, but it also has the best added features that will help run your site smoothly. If you want to protect your contact information online, its domain privacy feature is great too!
If you ever grow way bigger in the future, you can always upgrade to the Dedicated Hosting plans or VPS Hosting plans that Bluehost has!
Once you decide on the plan that you want, click the corresponding button: “Select”.
.
#3. Time to register your FREE domain name! First, make sure that you are registering it under “Create a new domain”. Type in your blog name without spaces, and in the dropdown beside it, ensure that you have selected .com. (You can definitely select the other extensions like .info, .net, etc. but I always recommend that you use a .com.) Now click “Next”.

NOTE: If you already have a domain name registered elsewhere or if you already have an existing website, just register it under “Use a domain you own”. Transferring it to Bluehost is FREE and easy once you sign up with them.
.Otherwise, if you still haven’t come up with a domain name, you can just click the text that says “I’ll create my domain later“.
#4. Once it is confirmed that your choice of domain name is available, the next page will be the billing section.
Simply fill the boxes with your information under Account Information.
Next, under Package Information, take note of the dropdown for ‘Account Plan’ that lists possible period plans.
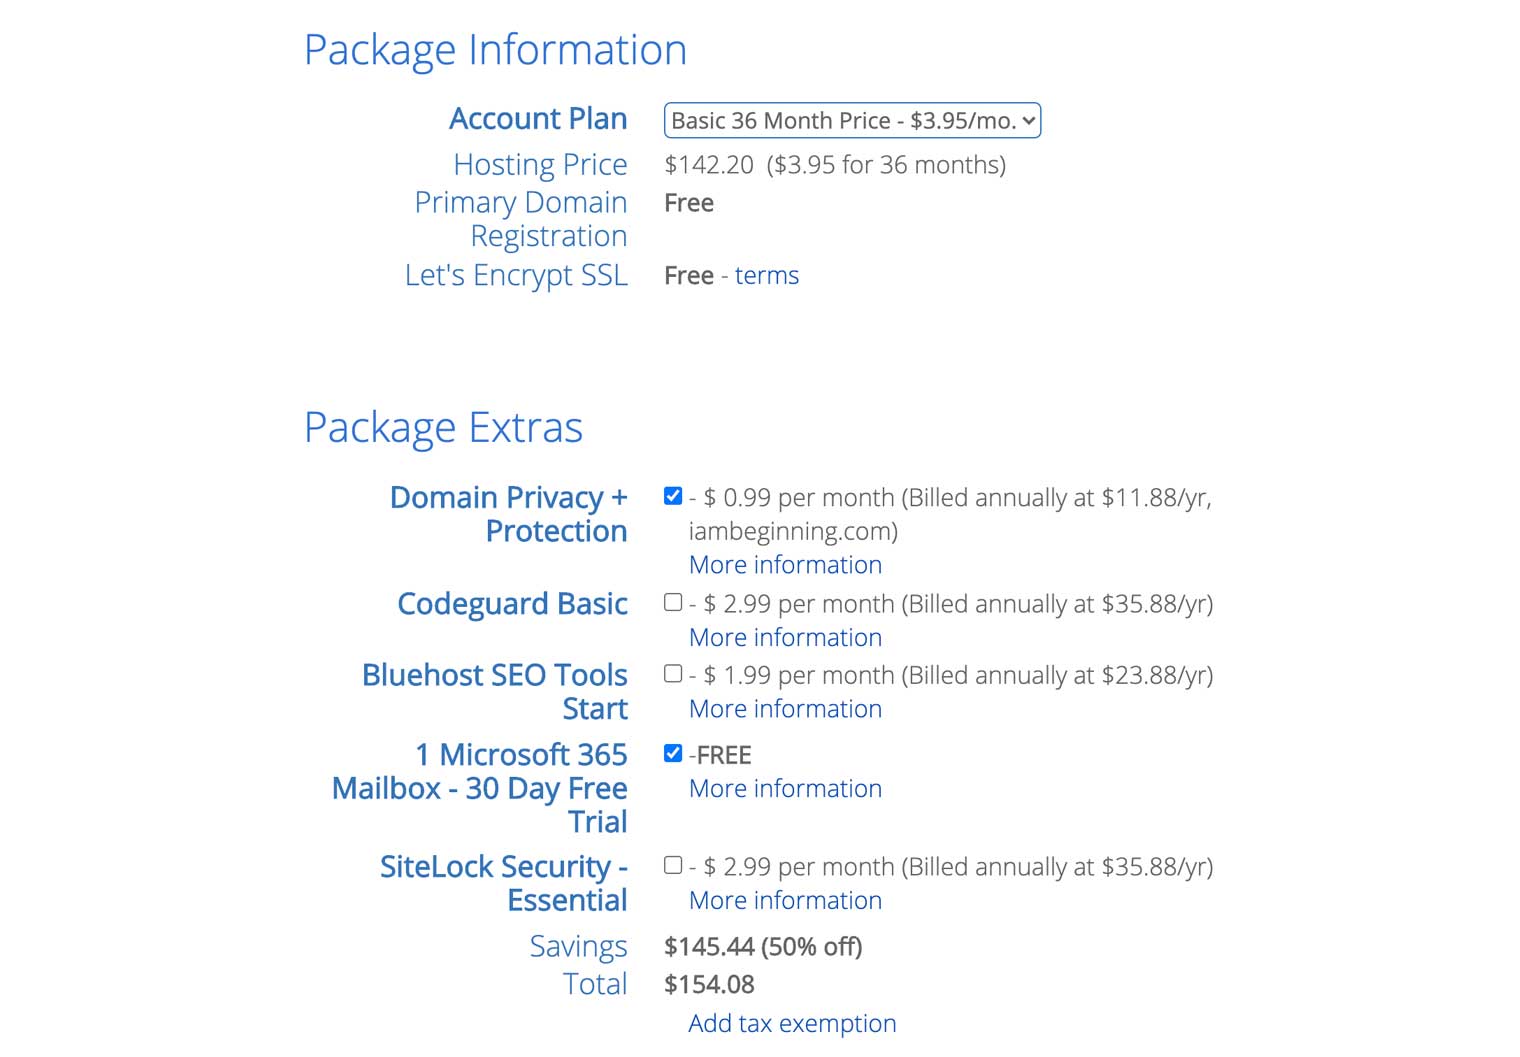
If you have the extra money to spend, I suggest that you go for the 36-month package option in the dropdown selection because it’s the maximum plan that offers a great-for-value discounted monthly rate. However, if you can’t afford the total bill for a 36-month, the 12-month option should be fine for a start.
FYI: This is a common discount style across all hosting providers if you research how to start a travel blog. The difference is that with Bluehost, it already gives a huge standardized discount for any length of period, whereas other providers only put a huge discount if you pick the longest period.
For Package Extras, if it’s not included in the plan you picked, the only extra I recommend that you purchase would be the ‘Domain Privacy + Protection’, since like I mentioned previously, it protects your private info from being looked up by anyone on the web (specifically your name and address that you had input in the Account Information section). Don’t also forget to check the ‘1 Microsoft 365 Mailbox – 30 Day Free Trial’ since it’s included FREE.
NOTE: Sometimes, depending on the country you’re in, there could be an additional tax cost added to the total amount. Most countries don’t charge on hosting but there are some who do and it should be no more than $25.
Once you’ve decided on the extras that you’d like to avail, proceed to fill up your credit card information under Payment Information.
Once that’s processed, you now have your hosting account set up! Just follow the next on-screen instructions to create a password and then we’re on to the next step where I will teach you how to put up your blog through a self-hosted WordPress site.
NOTE: If you have set up a blog before in Blogspot/Blogger or WordPress.com, Bluehost can easily import your posts for you to your new WordPress.org blog so no worries there! Just contact them about it.
• • •
Step 4: Install WordPress & Create Your Own Domain Email

“Is there a difference between WordPress.org and WordPress.com?”
Yes! In a nutshell, both are FREE BUT WordPress.org is the best platform to use when running a self-hosted blog (refer to step 2 of this how to start a travel blog guide as to why a WordPress.com-run site is NOT ideal).
There are other blog platforms like Wix or Squarespace that other bloggers use — however, I do NOT recommend these. They are not as flexible, not to mention, you have to pay a fee in order to use them! WordPress.org, on the other hand, is FREE forever and used by many (most people who used Squarespace, for example, transitioned to WordPress eventually).
In fact, WordPress.org is used by big websites like BBC, CNN, and New York Times! All you need to have in order to install and run it is a domain name and hosting — which you now have after registering with Bluehost.
Truth be told, Bluehost automatically installs WordPress.org when you signed up with them as your web host — so yes, you don’t need to do anything anymore. It’s that easy! (To access your WordPress.org dashboard, the URL usually looks like this: yourblogname.com/wp-admin/. These details will be sent to you via email by Bluehost, so don’t worry!)
WordPress is pretty straightforward and easy to use, but if you need guides on how to use and navigate yourself through the pages of the interface, you can always check out FirstSiteGuide’s tutorial or read through WordPress.org itself.
.You can also check out Bluehost’s WordPress guide. Or if in doubt, feel free to strike up a conversation with their customer service team through their chat feature!
BONUS: In order to help you look like a professional and serious travel blogger, you would need your own .com email and it’s pretty easy to set that up with Bluehost. Simply follow the steps mentioned in Bluehost’s Email Management guide.
• • •
Step 5: Pick a Theme That Will Stand The Test of Time
“What’s a theme?”
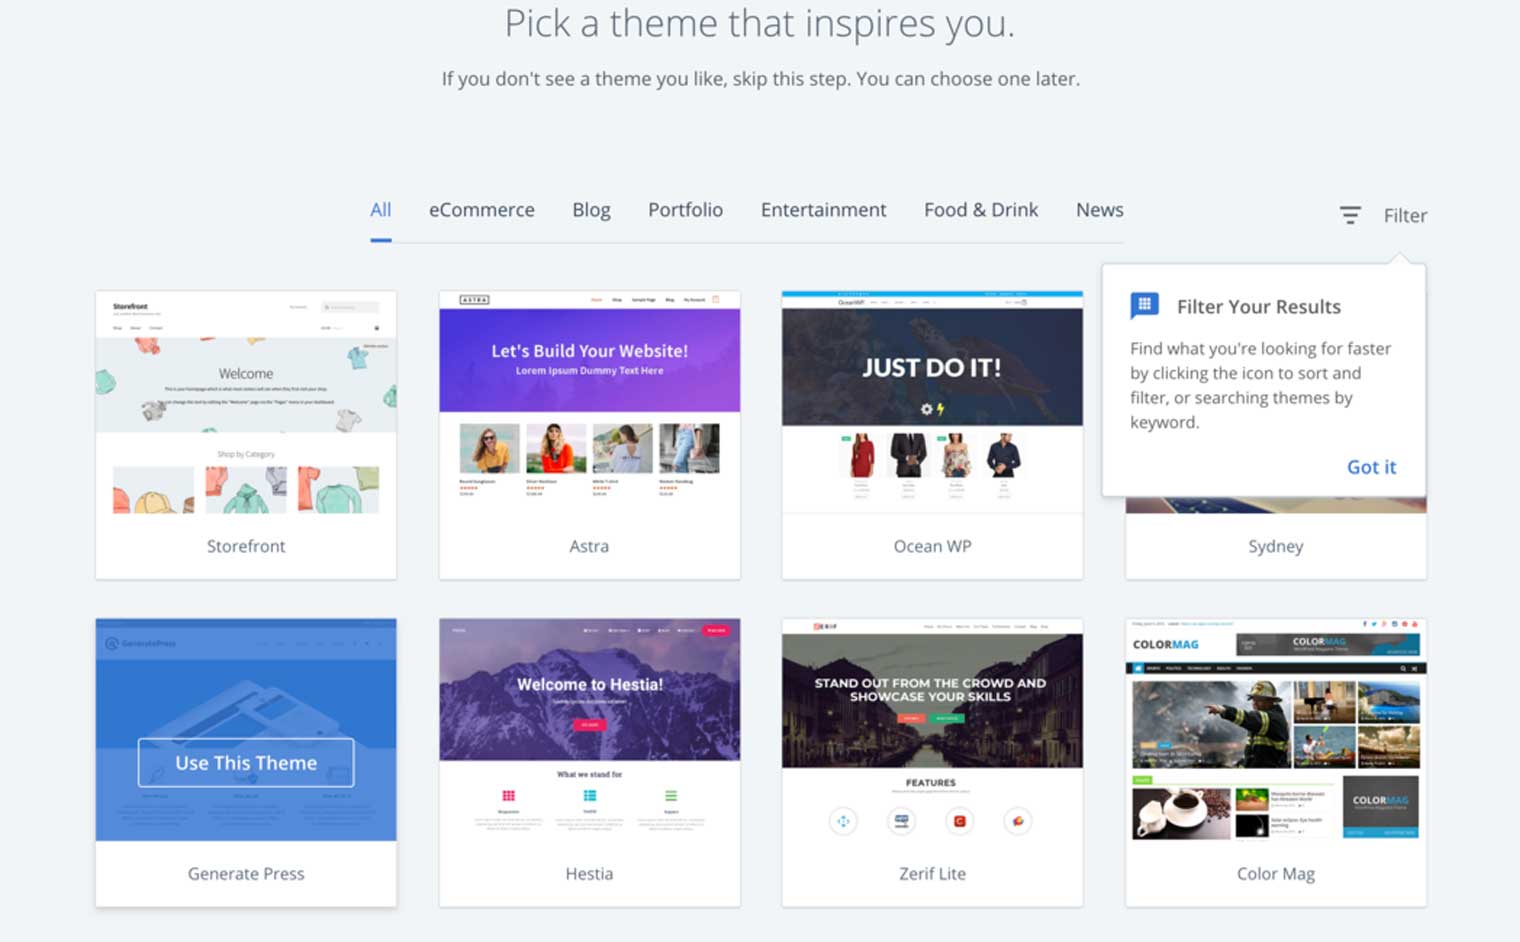
A theme is basically the design and layout of your WordPress.org site! In case you missed it during the sign-up process with Bluehost, there is a page where you can get to choose a theme for your site for FREE! The awesome thing about this is that you don’t really need to know HTML and CSS coding in order to come up with a nice website design because these themes already have set templates that you can easily edit.
To install a theme for your site, here’s what the page would look like on Bluehost. (To open/view the section below, click the ‘+’ symbol).
» How to install a theme easily!
#1. In the next pages, just click Log-in by entering the password you previously set up. This will lead you to the page below that lets you choose a design theme for your site for FREE. If you’re not sure about the design choices below, do NOT worry because you can change this later on!
Aaaand woop, congratulations! You now have your .com travel blog up and running! Watch out for the email from Bluehost that will remind you of the details of your account as well as your username and password for your WordPress.org site.
#2. If in case you missed this page, you can easily set up themes from your WordPress.org dashboard itself. To do so…
– Go to your WordPress dashboard (usually the URL looks like this: yourblogname.com/wp-admin/).
– Hover over the “Appearance” on the left sidebar and click “Themes“
– Hover over the theme you like (e.g. Twenty Twenty-One) and click “Activate” to make the theme the new design of your site!
– To look over other FREE themes, simply click “Add New Theme“
.
— and that’s it. Your site should have a better look and feel now!
…Though if I may share a pro tip when learning how to start a travel blog, even though you can change your theme afterward, it’s a good idea to plan your long-term “branding” as early as now and choose a theme that you will likely stick to for years to come. I say this because most website nowadays use a thing called ‘shortcode’ and if you change themes, your site and posts may end up breaking — thus requiring you to do a lot of work to update those shortcodes once you decide to switch themes.
.
“So should I get a FREE theme or a paid theme?”
There’s nothing wrong with choosing a free theme for your blog because most starting bloggers start with a free theme after they learned how to start a travel blog; and then, later on, buy a paid theme.
But hear me out: the big disadvantage that I see in using a free theme is the (annoying) limitation on its editing capabilities and design layouts. Not to mention that since they are free themes, the developers or the people who created those themes will NOT bother to update them — so if let’s say WordPress.org makes a huge update for security and other capabilities, your theme will end up incompatible with this update!
With all that said, if you want to save time and avoid future headaches, I suggest investing in a paid premium theme (usually starts at $30) that is:
- Regularly updated by its developer(s)
- Offers comprehensive guides and customer support
- Tablet and mobile-responsive
.
My site currently uses the Divi theme from Elegant Themes. I have used a different theme before this one — BUT I wished I used Divi at the very start because it is such an amazing theme with so many capabilities!
You can search through Google yourself and you will see the positive reviews and praises for Divi. Besides, it is currently the most popular WordPress theme in the market given its long track record and performance. PLUS: the biggest advantage to it…?
“Divi is a website building framework that makes it possible to design beautiful websites without ever touching a single line of code and without installing and configuring dozens of disjointed plugins.
.It can be enjoyed by design professionals and newcomers alike, giving anyone the power to create spectacular designs with surprising ease and efficiency.”
So yes, it’s the perfect theme for newbies like you who have no background in HTML or CSS coding, thereby saving you money from hiring an expensive web designer!
Anyhow, if you want to explore different options, below are some of the other top websites when shopping for paid or premium themes:
- Creative Market: An amazing community of designers offering affordable premium themes
- Theme Forest (or Envato): One of the biggest marketplaces for WordPress themes
• • •
Step 6: Customize Your Blog Theme and Design

“What else do I need to consider for branding?”
Theme
You will now need to edit the theme that you installed so that it matches the kind of ‘look‘ that you’d want your travel blog and pages to have. To customize your themes, most paid or premium themes will have a guidebook or list of tutorials. It’s important to read this first so that you don’t get lost when you start to do further customizations.
The Divi theme I use, for example, has a ton of resources that will help guide you in customizing your WordPress blog, and it’s very helpful! If, however, you are pressed on time, you can always get a web designer to do it all for you. For this, you can check out Upwork and Fiverr for affordable yet talented freelancers to hire.
.
Colors, Logo, & Font
The next step is to further customize the tone or feel of your website — e.g. do you want it to feel professional or fun, etc.
To do this, first, it helps to determine your travel blog’s color palette. Limit this to two or three colors only and make sure that they are NOT colors that hurt the eyes when viewed on the screen (e.g. bright neon pink, etc.). It’s important to determine this since it will be helpful when creating your logo, as well as in sectioning text headings for your posts and pages.
Once you decide on your colors, proceed to create your blog/brand identifier or your logo. If you want to create one by yourself, there are three ways to do it:
- Start learning Adobe Photoshop – for creating or editing graphics, it’s helpful to learn it as early as now so you can create your own — which you’ll be doing LOTS of as you run your blog (the only downside is that it could be time-consuming to learn everything)
- Use Canva – a great platform for designing and creating graphics even if you’re a total beginner (given that they already have set templates, etc.)
- Buy from Creative Market – choose from a huge number of premade logo templates that you can easily edit (some will use Canva but some might need to be edited on Photoshop)
Or do you want another person’s help? I’m a graphic designer myself, so I can help you out when I have the time. Otherwise, like I previously mentioned, you can refer to websites like Fiverr that can offer a graphic service for as low as $5. There are some bad designers but there are good ones too, and it’s easy to weed out the ones that don’t give quality work if you read the reviews. If you want higher quality work but don’t mind the price, you can post your job requirement to Upwork or 99 Designs.
Afterward, still in line with your design branding, (if it’s not already provided from a premade one) find a font to use for your logo and even for some text headings. Try to minimize this to two at most, and you can buy these typefaces from Creative Market or Envato.
.
WordPress Plugins
This is one of the reasons why I love WordPress.org: their plugins. You can think of these as like apps that help improve your site. After all, most themes don’t have ALL the capabilities or customizations that you need so you’ll definitely be needing some plugins! But actually, with Divi, I don’t have this problem because it’s such an amazing theme. Hence, I don’t have a lot of plugins installed — which is great because, in order for your travel blog to load fast, you need to have a few plugins installed.
Therefore, when learning how to start a travel blog properly, here are the essential plugins that you need to have which you can easily add to your blog by going to your Dashboard: click ‘Plugins > Add New‘. In the search box, type the plugin names below and click ‘Install‘ as needed (otherwise, if it’s a file, just upload the .zip folder after clicking ‘Upload Plugin‘ on the ‘Add New’ page).
- Akismet – to protect your website from spam comments made by bots and spammers.
- Yoast SEO – to help optimize your blog’s ranking for Google. If you ever need help, the creator’s website has several tutorials that can help you manage your SEO better.
- Google Analytics – to track the growth of your blog. This is an important thing for you to set up! Google Analytics (GA) is a powerful tool that helps measure and analyze your blog’s traffic and in the future, advertisers would need data from this platform. So first, you need to register with GA and then install this plugin to easily integrate GA’s tracking on your website.
- WP Rocket – to speed up your website and help it rank better on Google. There are a lot of ‘caching’ plugins out there but this is the best on the market. This involves a lot of technical jargon (which I will explain in more detail in my other posts as well as in my Blogging Master Class) but it’s an essential plugin that you need to have especially since Google now takes into account fast page load times for ranking.
- WordFence – to help secure your website from hackers and malware. It has a FREE and paid version and the free version is enough to start with.
TIP: Not exactly a plug-in but it helps to install the Grammarly Chrome extension so that it can capture any embarrassing typos and grammatical errors in all your posts and pages!
• • •
Step 7: Set Up Your Blog’s Main Pages
“What are the main travel blog pages?”
When learning how to start a travel blog, don’t confuse WordPress pages with posts. These are both content types but the difference is that pages are the main sections of your site (e.g. about page, blog page, contact page, etc.), whereas posts are the blog articles that are arranged chronologically and by category.
For this section, you need to organize the pages of your blog in order to improve the navigation and user experience. To come up with ideas on the best pages that you need to have, you can try looking at your favorite websites and gather some ideas. As a start, below are the basic pages that you need to have:
- About – to introduce yourself. Make it engaging and informative in order to make people want to follow you.
- Blog – to show a summary of all your latest posts.
- Contact – to enable people or even brands to reach you.
- Privacy Policy – to protect your rights and affirm your protection from any liabilities as an online blogger (there are websites like Termly that can help generate a blog disclaimer for you)
- Others – as you grow, you might need other pages like what my blog has (example: FAQ, Press, Travel Tips, Destinations, etc.) and it’s totally up to you if you want these or not. You can get some helpful ideas from my pages but please refrain from copying the layout and design wholly.
.
Once you have these pages set up, don’t forget to organize them on your menu bar so that your readers can easily navigate through the sections of your site. To customize, just go to your Dashboard and click on ‘Appearance > Menus‘.
Other sections that you can customize are the following…
- Footer. This is the bottom part of your page and you can do whatever you want for this. Some people simply leave it blank, while others include their social media links, email list sign-ups, etc.
- Sidebar. Typically appears beside your blog posts/articles so that you can remind your readers about important parts of your blog — it’s also great for promotions (e.g. advertisements). To control the contents that will show here, you just have to access your widgets section at Appearance > Widgets. For this, you can put your:
- About – Make it brief or catchy, and then include your photo along with a link that leads to your about page.
- Social Links – Promote your social media accounts! You can choose to show big boxes like this one by Facebook or you can use icons that would link to your account by using a plugin like this.
- Newsletter – Encourage people to subscribe to your updates and retain an active community, this can be made possible if you create email lists from websites like MailChimp or Convertkit (which I personally use if you want to scale and earn from your email list). After registration, these websites also have plug-in widgets that you can easily include on your sidebar.
- Popular Posts – to help direct your readers to your other articles, download this plugin, and display its widget.
• • •
Step 8: Secure Social Media Handles & Start an Email List

This is a vital step when learning how to start a travel blog! Sure, your blog can grow by itself with the right SEO tactics… BUT if you want to amplify that growth, you must do promotions and start being ‘social‘ online and establish your web presence. So with your blog name, quickly register on the big social media platforms like Facebook, Twitter, Instagram, Pinterest, and YouTube.
TIP: Keep the usernames the same as your domain name with no added dots, underscores or hyphens. I made you check this beforehand in step #1 because it’s definitely easier for your current and potential followers to find your linked social profiles with just a quick recall of your name.
.Don’t follow my example… I happened to be too late on the Instagram hype that by the time I registered, someone already had my username ‘iAmAileen’ so I ended up going for i_am_aileen — which is a hassle to type with the extra underscores!
“Now that I have “parked” myself in these social media accounts, does this mean that I need to be active on ALL platforms at once?”
Not at all! Because if you do, you’ll most likely waste so much effort and time juggling too many platforms at once. While you’re still starting on learning how to start a travel blog, it’s important to put all your efforts in one or two social media platforms at first. To determine which social media channel to use…
- Find your strength. Are you skilled in creating photos? If yes, Instagram and Pinterest could be your bread and butter. Or are you rather into videos? Focus on YouTube or Tiktok for now. Do you like to talk instead and conduct interviews? Podcasts could be the option for you by signing up on Spotify or promoting it via Facebook or Instagram LIVE/Reels.
- Find where your audience is at. As a starter blogger, it will be hard at first to find this — but there are ways! Other than observing your competition, you can also create a simple survey for your readers to ask what platform they typically use.
.
“What is an email list?”
An email list collects the names and email addresses of people who gave you permission to send them updates of your blog. For them to sign-up to this list, you can create a newsletter through websites like MailChimp or Convertkit which both come FREE with a maximum number of 2,000 subscribers — a pretty good deal!
It is important to have an email list when learning how to start a travel blog because though there are social media channels, a majority of people still use emails and prefer to be notified through it. For this reason, you should take the chance and create one! Besides, it will help a lot in the future whenever you have giveaways, contests, or products to promote since you can also track email opens, conversions, and more! Plus, with Convertkit, you could even scale and do email automation to better increase your chances of earning more blog money through the promotion of your articles or affiliate links.
Got more than 2,000 subscribers? Convertkit is a LOT cheaper than Mailchimp if you want to upgrade. You could even get a 30-day free trial before doing the monthly payments. Another alternative is Aweber.
• • •
Step 9: Create Engaging Content

“How can I create content that stands out from the rest?”
Some factors to consider as you learn how to start a travel blog and promote it…
First, create pillar categories and posts. It’s important to brainstorm about the main topics that you plan to discuss in your blog in order to come up with about 3 parent categories that you will use for all of your blog posts (e.g. a parent category of ‘Destinations’ and its sub-categories are the continents). After you set this up, it’s helpful to come up with ‘cornerstone’ main blog posts for each of these parent categories in order to further develop your website’s SEO, and then creating several sub-posts that link back to ‘support’ these main blog posts. (I will discuss this in more detail on my Blogging Master Class course).
.
Learn basic SEO. I’ve already mentioned and explained SEO in the previous sections of this how to start a travel blog guide and I cannot stress enough how important it is! So please take the time to learn this either by reading through Yoast’s guides or by learning through comprehensive SEO courses.
EXAMPLE: If you apply SEO properly, you can take the first spot on Google searches. For instance, if you type “unusual travel words” on the search bar, you will find that my post is ranked first.
.
Create original and engaging content as per a content schedule. It always helps to plan ahead and set out a posting schedule that you can stick to. After all, it does not only keep your readers updated but it also helps your rank on Google (as it will notify the algorithm that you are someone who is ‘current’ and posts regularly). I recommend posting at least 3 times a week; but eventually, you will get a feel of the number of times that you have to update as well as the best days to post so this frequency can go higher or lower (you can refer to your Google Analytics data for this). For instance, some bloggers have marketed themselves as Thursdays-only and that is quite a clever way to keep your readers coming back on a certain day.
TIP: If you’re running out of ideas on what to post, other than observing the competition, make sure to look at trends. The website AnswerThePublic is also great for finding topic ideas after typing in a certain keyword.
Quality is ALWAYS better than quantity. Tons of content won’t matter at all if they’re not well-written, SEO-optimized, nor meaningful. So how can you make great content after you learn how to start a travel blog? Through practice and research.
~ Keep writing and learning – you’ll eventually find your own blogging style and voice
~ Ask other people’s opinion before posting – it can be family or friends
~ Try to see what the other big bloggers are doing – do NOT copy or plagiarize, just draw inspiration from them!
Ultimately, just tackle the topics that you would personally want to read or know about if you were to place yourself in the shoes of your readers.
.
Get visual. Use attractive visuals to further attract attention — most especially when posting on Instagram and pinning on Pinterest. Other than working on your photography skills, you can get stock photos from Shutterstock or Unsplash.
.
Promote your content through social media. It helps to create a schedule or checklist so you are focused on the social media sharing that you have to do after every new blog post (Later, for example, is a great Instagram scheduling tool). You can even try approaching big Facebook travel pages to see if they are open to allowing you to promote your posts. If you join the right online communities too, you can even meet fellow bloggers who are willing to collaborate or even cross-promote!
Remember that success through your content won’t happen overnight. After you learn how to start a travel blog, it will take time and you need to have patience before you can see significant change. Like most success stories, you must have the commitment and drive to stay dedicated to your cause. Day by day, it really involves a certain degree of hard work and if you can find a balanced system for improving your blog, the results can be very rewarding.
.
BONUS TIP. Try creating content for bigger websites to gain exposure and link backs to your website. Other than tapping bigger travel bloggers if they’re interested in guest posts, you can also consider submitting content to bigger websites like Thought Catalog, Matador Network or Huffington Post. Trust me on this one: if you become very active in pitching your unique story or experience to big websites like these, you will easily skyrocket to online fame! (It helps your SEO too!) To search for more websites that are open to article submissions, just search for them through Google. Be mindful though that there are websites that can be tough to ‘get into’ but it’s always worth a try to get your name or face out there.
• • •
Step 10: Monetize Your Travel Blog and Reap the Rewards!
“I want to earn money after I learn how to start a travel blog! But just how exactly?”
Obviously, one of the best things about owning a travel blog is the numerous opportunities or ways for making money — and remotely at that! I first started this blog as a hobby; but after redefining my brand and streamlining my strategies, it is now generating me a 6-figure income passively… and yes, you can do this too!
However, it helps to note that since you’re still starting, it will take some time before you gain traction, authority and traffic. Still, It doesn’t hurt to start early and one of the best ways to get money as a newbie is through:
Affiliate Sales. This allows you to earn a commission if your reader chooses to purchase another brand’s products or services through your specialized links — and it’s at no added cost to them!. Since your blog is about travel, try signing up for related companies or affiliate networks namely…
Individual Companies
Affiliate Networks
TIP: Since you just started to learn how to start a travel blog, please don’t go overboard in monetizing your blog, or else, some of your readers will be put off by let’s say, the gazillion of advertisements that you will be putting up on your site. What can you do then? Take it slow, be picky, and only put up the kind of ads that can best fit your audience.
.
Other ways. Over time, once you have enough posts, start to get a bit of decent traffic, and have established authority, you can start to do the following:
- Earn through Google AdSense for pay per clicks or Mediavine (minimum of 50,000 pageviews) or AdThrive (minimum of 100,000 pageviews) for pay per views — basically, earn through advertisements!
NOTE: If you focus on doing travel vlogs (video blogging), YouTube’s partner program works alongside Google AdSense for monetization, so make sure that you enable that. - Sell your own ad space on your travel blog
- Sell eBooks, consultation/coaching, or other digital products and services
- Sell your services for social media promotions
- Do sponsored posts or paid reviews (on products, services, etc.)
- Partner with brands for paid collaborations, etc.
.
Regarding the last bullet, once you have earned a good amount of readership (as evidenced by your website’s stats and following) you can use this data to pitch your blog’s influence to tourism boards, hotels, brands and airlines in order to get paid projects. Be aware though that this can be very tough and that more often than not, you will receive a reply that basically says NO to your proposition — but hey, what will you lose by that? Nothing!
You’ll just feel that tiny pang of disappointment that they didn’t like you… and well, you can handle that, right? Besides, even if they say ‘no’ at first, you’re free to re-try again after you grow your blog further and make your pitch better (find out what they’re looking for, state what you can offer in return, etc.)
There is no magic number to knowing how big you have to be in order to be eligible enough to pitch with brands; but surely, monthly visits of 1,000 and a total of 100 social media followers won’t do the trick.
.Anyhow, what’s important in order to ace a partnership or sponsorship is to show that you are bringing in VALUE — that you have an engaged audience, and that you have a blog that is fit for the brand’s needs.
.
Here are some tips when contacting brands:
- Sign up for the Gmail extension: Mailtrack! This notifies you whenever someone opens or clicks on a link on your email, and that helps a lot for tracking. For one thing, it will aid you in estimating the time that you can send another email follow-up. (For example, since you clearly know that they opened your email, you can try following up 3 days after they opened it; otherwise, if they haven’t opened it at all, a good rule is to follow up after a week the first time you sent it with a max number of follow-ups at 3).
- Do your own research. Find the appropriate marketing or press contact on the website (you can also use a Google Chrome plug-in like Hunter). If you can’t find the right address, simply contact the generic address on the website to ask for the correct email that you can send your message to (or send them a message via their social media page). You can also simply write your proposal and ask them to forward it to the right person.
- Target brands that are evidently concerned about social media. It helps to partner with brands that are active on social media or that have partnered with bloggers before. This gives you the assurance that they are interested in growing their online reach (which you can try and help them with).
- Be convincing, direct, and honest. Be clear about your request right from the subject and first sentence of your email. Assure them on how you can grow their customer base or online exposure. It’s basically about HOW you can help them, and not about how they can help you. If you have a unique campaign that you think you can tailor well to their product/service, then don’t be afraid to pitch it! If I may add, it also helps to have a media kit to quickly show your website’s stats. (See media kit examples here).
- If you’re not good with Photoshop, try out Canva.com which is very easy to use even if you’re not good with graphic design.
NOTE: Don’t go crazy! Don’t pitch to every company that you know of. You still have to make sure that the company that you are trying to partner with is relevant to your blog.
• • •
BONUS: Join My Blogging Master Class Course
- Are you looking for more in-depth advice and tricks on how to start a travel blog?
- Do you want a detailed discussion about my best-kept secrets and tools for growing a blog and generating a HUGE passive income?
.
With my upcoming Blogging Master Class, you will gain comprehensive insights that will answer these two questions above — and more!
Extra FAQ: About How to Start a Travel Blog
I had this same bleak thought back in 2014, but I’m glad I pushed through — today, I am passively earning a 6-figure income from this blog alone, so you can just imagine how much I would have missed if I refrained from building a blog! The way I see this, there will always be saturated markets BUT it doesn’t mean that an opportunity does NOT exist in it. Because there is, there always will be. You just gotta dig deep. In fact, there are a lot of readers who have jumpstarted their blogs despite their fears by following my ultimate guide here, and by now, they have tripled their traffic and have even started doing paid projects! Bottom line: if you work hard yet smart, you can still achieve great results despite a crowded blogging scene.
In some way, it might be hard to establish yourself as a trusted personality if you don’t really travel at all — BUT, it is still and always possible to succeed as a travel blog if you don’t travel at all! How? Well, it all lies in having SEO-driven content and strategic positioning. I know a couple of blogs who are ‘generic‘ with not even a face behind them, and yet they have managed to rank high on Google. How? Mainly by targeting a specific niche and applying the right strategies for SEO and promotions. They also know the latest trending topics to take advantage of! Some bloggers even take on guest posts from people who actually travel. In short: yes, there are ways so it’s absolutely possible.
Through a LOT of means. The top three things would have to be through affiliate earnings, advertisements, and paid partnerships. The icing to the cake? These can all be earned passively and I’ll teach you how in my other blogging tips posts.
Anybody can learn how to start a successful travel blog — but not everyone can maintain it. This is why I think it’s absolutely important that you love and are highly interested in starting one. Why? Because it involves a lot of work and if you don’t find enjoyment or any sense of accomplishment in it, you might just break. After all, not a lot of people seem to realize that a blogger is typically juggling all sorts of tasks at once: being the writer, copywriter, researcher, photographer, videographer, editor, designer, developer, model, manager, promoter, and SEO specialist among many others. As such, if you don’t like the hustle, you really won’t last long in this industry.
For instance, I personally don’t enjoy the process of promoting on social media as well as the act of editing photos/videos. The thought of it bores me… but when I think of my passion for traveling, for connecting with my community, and for sharing my stories as well as tips/hacks, I eventually find the joy in the challenge of managing it all, as well as in keeping up with the trends. I think in some way, I even think of it as a game wherein I “level up” each time I get over a hurdle that brings out the lethargic side of me. That’s why in the end, I think this is why I have lasted in this industry — and I’m sure you will too.
• • •
Overall
I tried my best to be as detailed as I could in this and I dearly hope that this helps you learn how to start a travel blog successfully. Good luck!
P.S. Please feel free to message me if you have any questions about how to start a travel blog. I would love to help you out!
See the top must-haves you’ll need in travel blogging for beginners. Otherwise, you can check here for the rest of my top blogging tips.

We will never start until we take a step. I used to see blogging as something difficult or as disappearing since videos are taking over, till I read this post. Hopefully, I will start a blog next month. Thanks
OMG your post is really detailed and helpful. I was trying to find this post to read while I was working on building a blog. Thank you very much, Aileen.
So happy to hear this! All the best in your blogging journey :D
So many wonderful tips in here. I only wish I knew most of this before I started. Wishing all new travel bloggers well!!
Wow!!! It was a great blog with so much information about how to start a travel blog from Scratch.
Your ultimate guide may help me to create my blog and I hope that I will get rank from this blog also.
I’m on the cusp of planning my travel blog and found this incredibly useful! Thanks so much from Australia :)
That’s great to hear! Let me know if you have any questions :)