Much like you, I always search for the best resources and tips on how to edit videos for YouTube. For instance, I want to know how that certain vlogger does certain effects — or, where does that popular YouTuber get his music that is safe for monetization? And how does he record all of his/her video footage?
…And well, sometimes I get the info that I want; BUT most of the time, I don’t. So yes, it can get quite frustrating especially when bloggers themselves refuse to share their best-kept (secret) resources to help others out.
Looking for Other YouTube-Related Tips?
Check out a list of these top vlogging tips!
Rest assured, armed with my years of knowledge and experience on video editing + vlogging, I’m here to help you out!
I hope that the way of how I edit videos for YouTube can also be solid proof of how I can help you improve the way that you edit your vlogs. Plus, I don’t ever want to be stingy with all the resources that I’ve managed to discover, so with that said, let’s get on with this post as I explore all the F.A.Q. or frequently asked questions that are either asked of me or highly searched.
How to Edit Videos for YouTube
» What is the best camera for vlogging?
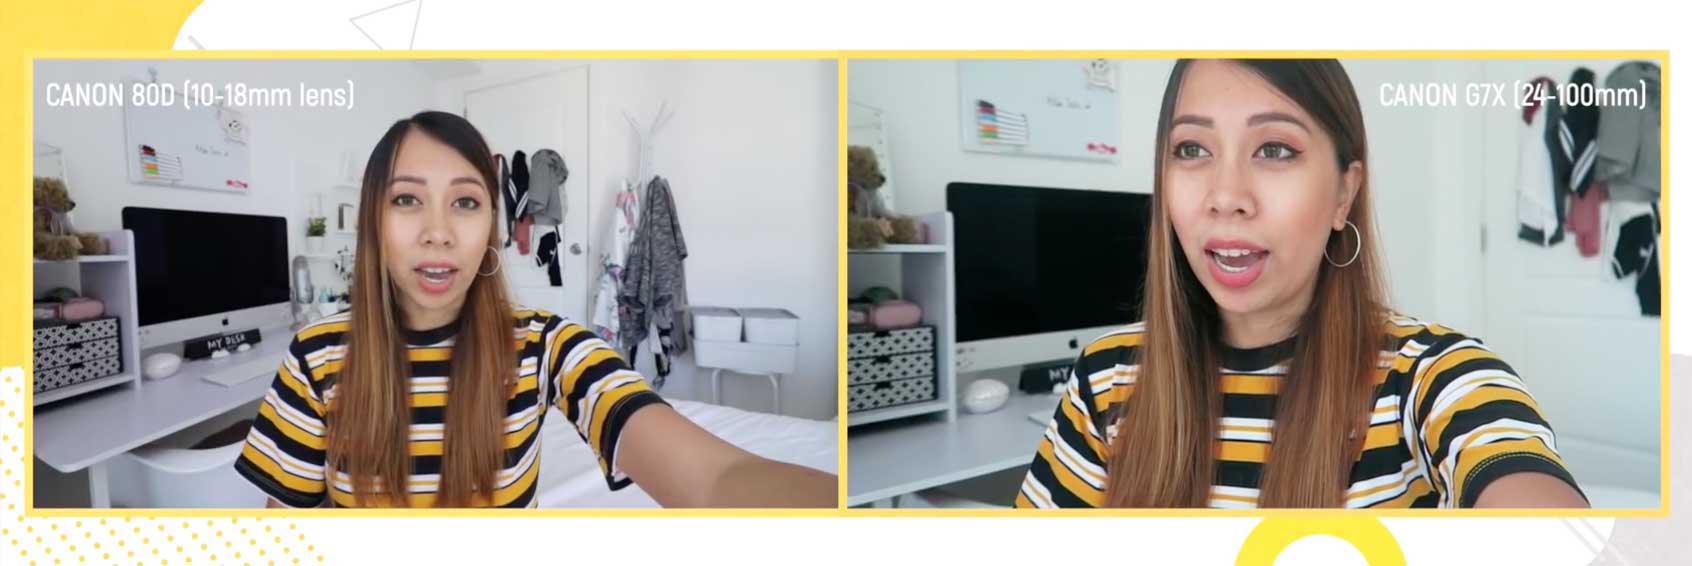
I personally use a Canon 80D DSLR in which I typically use my 10 to 18 millimetre wide angle lenses that is great for landscapes and vlogging because of how wide its scope is.
To give you guys an idea, you can see this sample screenshot in which the left part is where I used my 18mm lens while the right is taken by my Canon G7X which is at its ‘farthest’ (24mm).
Take note, I was holding both of these cameras in the same height with my arms stretched out, so you can definitely see the difference.
If you want to use a phone for recording videos, some brands like Huawei already have wide angle modes. Otherwise, there are clip-on phone camera lenses that you can use!
The body of the Canon 80D usually comes at around $1,000 and the lens’s is at about $250 — so yes, it’s quite expensive but it’s a great investment for your vlogging journey.
I’m quite happy with this gear; but of course, I am interested in upgrading soon because there are some cool new gear out there like the Canon 6D Mark II and the Panasonic Lumix GH5.
BUT here’s the thing: you DON’T really need all of this expensive gear especially if you’re still starting out or don’t have much of a budget. In fact, a lot of popular YouTubers started out with just their smartphones — so you can definitely do that too!
Besides, I’m pretty sure that you’ve heard this time and time again (but it’s proven to be true since it’s essentially what matters the most)…
CONTENT IS KING.
Though of course, if you have some money to spare and you want to invest in a good starter camera for vlogging, I would highly recommend the Canon G7X Mark II (a newer model of the G7X).
Wanna capture the best sound there is? Look into buying on-camera microphones like that of Rode.
.
Want to keep your video footage stabilized? Check out gimbals! There are gimblas for DSLRs or bigger cameras, as well as gimbals for mobile phones.
.
Doing a lot of sports, outdoor activities, underwater recordings, or fast-paced shots? Of course, you can always rely on GoPro cameras!
.
Do you want to take cinematic bird’s eye view footage? Invest in a DJI drone!
– – –
» What is the best video editing software to use editing videos?
If you’re a beginner who’s trying to learn how to edit videos for YouTube, you can make use of FREE software like iMovie for Apple and then Windows Movie Maker or Microsoft Photos for Microsoft so that you can get acquainted with how video editing usually goes.
If you’re more experienced or if you simply want to do more complex and better-looking effects on your videos, these are the top 2 software’s that are used by Youtubers nowadays: Final Cut Pro and Adobe Premiere Pro.
Both of these softwares are items that you need to pay for, so it’s quite an investment — but their editing power is amazing!
I have used both of these programs and even if Adobe Premiere Pro is more advanced, I settled into using Final Cut Pro because apart from the fact that I work with an iMac computer, it is not too overwhelming to use. Not to mention that Final Cut Pro is a one-time purchase software compared to Adobe Premiere Pro in which you have to pay $50 monthly.
For sure, it can be quite intimidating to work your way through these programs as a first-timer who is still learning how to edit videos for YouTube; but fret not, because learning sites like Udemy and Skillshare have a wide range of FREE and paid courses that will guide you (apart from the fact that there are endless numbers of videos on YouTube that you can watch to learn more about video editing).
– – –
» How to make cool animated video titles or text?
There are already a number of set text or title designs on Adobe Premiere Pro as well as Final Cut Pro — but for the remainder of this article, take note that I’ll be focusing on Final Cut Pro’s features.
As such, when it comes to pre-installed titles, some of the ones that I like are ‘Typewriter’ (which gives out the effect as is) and then the 2D styles of ‘Faux 3D’ and ‘Offset’.
After I set these titles, I usually play around with the settings such as changing their tracking or space and some others — just so I could improve it a bit more.
Check out this Final Cut Pro courses that will guide you through the basic functions of the software!
But for more advanced title effects, I use template title plugins from websites like LenoFX and Pixel Film Studios which a lot of vloggers use.
Now obviously, as you learn how to edit videos for YouTube using these title effects, most of them will have a price tag; but these sites also have cool freebies once in a while so you can take advantage of that.
If you are on a budget, rest assured, you can always DIY titles or intros and it involves a bit of graphic editing know-how. Once again, there are lots to be learned about this via free resources online — you only need to type it out on Google or YouTube and there will be a list of tutorials for you.
For graphic design, I use Adobe Photoshop. It’s daunting at first but you’ll eventually get the hang of it once you start to learn.
.
But for a quick fix, you can always make use of websites like Canva which has free templates for editing, for instance, your YouTube thumbnails, etc.
– – –
» Where to get cool fonts to use?
If you want free fonts that can be used commercially, you can check DaFont.com. They have a huge number of font designs that you can choose from!
Otherwise, you can sign up with Creative Market since they usually give out FREE fonts every week — which I’ve noticed that a lot of Youtubers have also been downloading from.
– – –
» How to do awesome video transitions and effects?

Transition and effects are great to use especially if you want to segregate sections, separate days, or just to simply add some added flair on your video clips.
Well, don’t worry because as you learn how to edit videos for YouTube, you’ll come to see that there are also already a number of built-in transitions and effects in Final Cut Pro. Some of my favorites are ‘Bloom’ and ‘Static’ under the category “Lights” under the transitions window, and then ‘Bad TV’, ‘Camcorder’ and ‘Simple Border’ under effects.
For more types, you can check by the previous sites I mentioned (LenoFX and Pixel Film Studios). Otherwise, there are a number of ways to do transitions and effects by yourself too! You only need to do a bit of research and learning.
– – –
» How to do awesome video transitions and effects?
The most basic way is to do it with Final Cut Pro’s color correction board in which you can correct the hue, saturation, and exposure of every video clip.
Another way that Youtubers do color correction is to make use of plug-ins that we call as LUTs (Lookup Tables) which are basically set color filters that you can just simply apply to your videos. They are certainly a bit more advanced but it’s a great way to color grade your videos better.
For some set LUTs that you can purchase, you can always find them on Pixel Film Studios or from another popular website called as Filter Grade.
– – –
» Where to get music that can be used on monetized YouTube videos?

YouTube is obviously getting even more strict on vloggers who use copyrighted music, so in order to avoid getting a copyright strike, it always helps to use music that is free for use.
There are a number of websites that Youtubers use for this but the top three would be Epidemic Sound (a paid membership site), Thematic (free and paid), the YouTube Audio Library (free), and SoundCloud (also free).
Speaking of which, the songs in SoundCloud are NOT all free or safe to use for YouTube. You have to check first if the artist who owns the music is permitting his or her tracks to be used for monetized videos (usually under a CC license).
What’s a CC license? A CC (or Creative Commons) license grants copyright permissions to creators’ work. There are different CC licenses but the most common one is a CC by Attribution in which you are free to remix, adapt, use, and build open a certain work (or song for this matter) as long as you credit or link back to the original creator.
To check if a certain song is good to use, there are four ways to do it…
- After searching for a keyword, filter the search results via the section on the left by clicking Tracks > To listen to > To use commercially.
- Check the artist’s profile.
- For example, Lakey Inspired clearly states on his artist bio that you can use his music as long as you give attribution which is basically linking back to his SoundCloud channel
- Check the music track’s description as it can sometimes show a copyright statement at the bottom, meaning that it’s also free to use.
- Simply message the artist by sending them a message.
I’m already following a number of SoundCloud artists who allow the use of their music in exchange for attribution so that I’m always updated on their newest songs that I can possibly use in my future videos. My favorites so far are Lakey Inspired, Joakim Karud, and Ikson.
If you’re still a bit paranoid if the music you’re going to use might be copyrighted, there’s always a way to check it and it’s to go to YouTube’s Music Policies page which basically shows all of the music that is not allowed to be used on monetized videos.
By the way, you might still see some vloggers who use some copyrighted songs on their monetized videos and are still getting away with it.
There’s actually a myth around the YouTube community wherein they’re saying that you can use copyrighted songs as long as you use them for only 10 to 30 seconds — which is total BS if you ask me. Even if those YouTubers are getting away with it right now, the platform is slowly cracking down on all of these people and they are always at the risk of getting a copyright claim (and thus, they’ll lose money later on, if not get their channel taken down altogether).
There’s also this other concept of “Fair Use” wherein you are free to use copyrighted music as long as it’s for the purpose of research, education, etc. etc… But again, it’s still tricky. You will actually find a lot of discussion on fair use online but if you want to avoid the unnecessary headache, just do NOT use copyrighted songs and materials.
– – –
» What is your usual video editing workflow on how to edit videos for YouTube?
It depends if it’s a video where I mostly talk or if it’s simply a vlog.
But for example, if it’s the talking kind, I usually do the script first and then after that, I record myself in front of a camera — or if it’s just a voiceover, I will use a USB microphone, and then I will sync it with my video clips and other graphics.
If it’s a vlog or any other kind of video that’s somehow similar to it, to save time, I first do a rough layout wherein I lay the clips as I want them to progress.
Once I’m done with that, I input the music that I’ll be using and then edit along the way as I trim off excess clips, time everything with the music, add transitions, and then some effects.
My last step is to always ‘proofread’ or review my work in order to ensure that everything is okay.
Check out the ‘Snapping’ feature of Final Cut Pro in order to help save even more time. It also helps that as you learn how to edit videos for YouTube, you acquaint yourself with some of the software’s keyboard shortcuts to work even faster than before.
• • •
Overall
I hope this helped shed some light on your concerns regarding how to edit videos for YouTube. Now, remember, don’t get frustrated during the process because as you go on, you’ll eventually master the basics and make video editing a breeze.
With that said, if you’re a “seasoned” YouTuber, please feel free to leave a comment below if you have any more tips to add! Otherwise, fire ahead on any other questions you might still have and I’ll try my best to answer them.

Hey,
What a wonderful article, I like the part where you advised about the awesome video transitions and effects.
This is how we can learn to edit videos for YouTube.
Keep the good work, as this article helps many people and in fact, translation is one of the best strategies for increasing YouTube growth and On average, two-thirds of a channel’s views come from outside the creator’s home country.
Thanks for sharing this helpful content. I would like to look forward to more content.
This was quite useful information that you’ve shared got to learn so many new things from this blog.
You are awesome thank you so much it really helps to get the idea!
Glad to hear this :) Good luck on your YouTube journey :D
Great article, it’s gonna help many newbies out there who are willing to be YouTuber.
Thanks for sharing. This is very helpful!
I’m very happy to hear that!